How to Develop your First (Agentic) RAG Application?

Developing a board-game assistant. No Vibes and Fully Local
In this tutorial, I will show how to create a simple chatbot with RAG running on your local machine or a dedicated cloud server using free LLM models.
We will develop an application that answers questions about the rules of the Gloomhaven board game. The game is fun, but the rules sometimes make your head spin.

Our handy, intelligent assistant will help us resolve some tricky in-game situations and provide us with the link to the relevant section in the rulebook.
The complete example code is available in this repository.
This tutorial is part of a series designed to help developers with no prior ML or AI experience learn how to leverage LLMs in their projects.
-
How to develop your first LLM app? Context and Prompt Engineering
-
(Optional) Prompting DeepSeek. How smart it really is?
-
(This) How to Develop your First (Agentic) RAG Application?
Tools Overview
There are much easier ways to achieve this with no-code or low-code frameworks, but we will dig deeper to understand the underlying concepts and frameworks and use minimal high-level tools.
We will use Agno, an easy-to-start agentic framework. One of its strengths is its extensive support of various vector databases, such as pgVector, Pinecone, and LanceDB.
We will make the demo work with an entirely local LLM. OpenAI is easier to use than local LLM. However, OpenAI is like vaping: it looks harmless, but it is addictive and expensive in the long run, and you probably don't need it. Additionally, OpenAI collects all your data to create a powerful superintelligence to enslave humanity.
What is RAG?
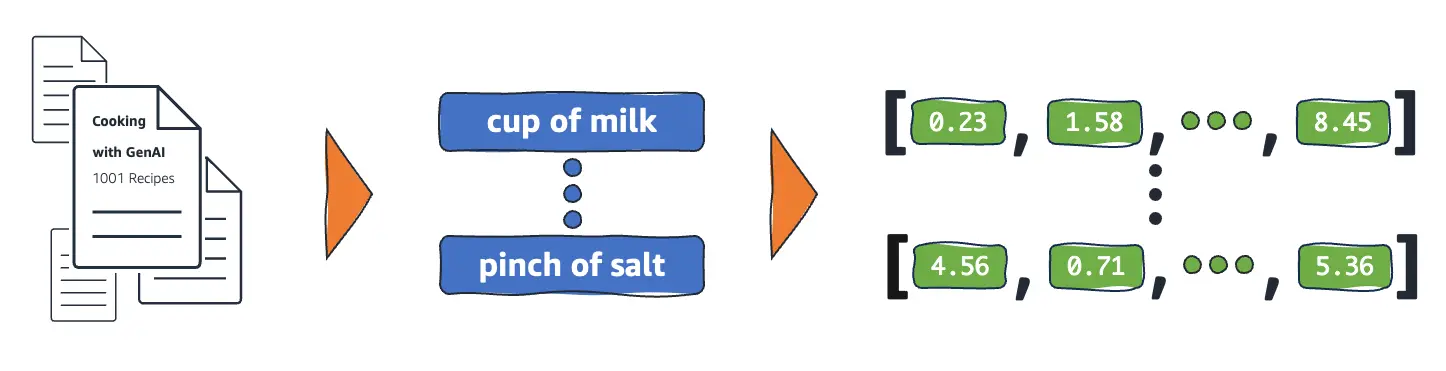
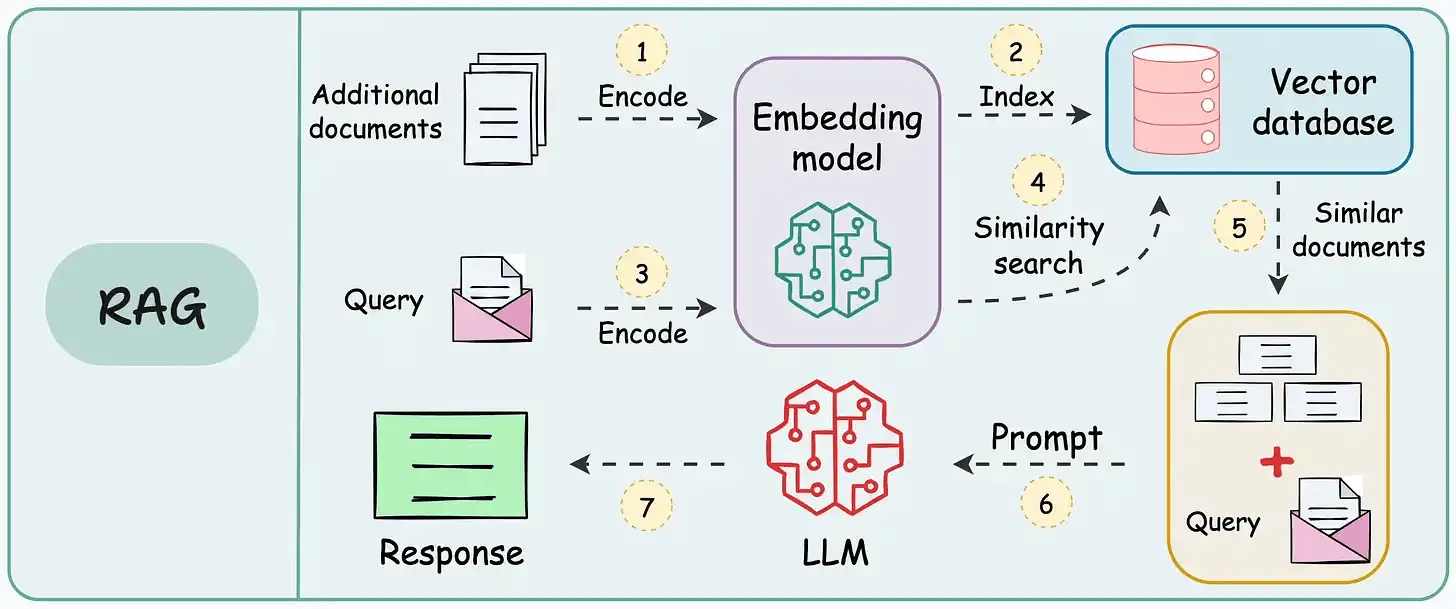
RAG enhances the model by retrieving relevant information from external sources, often a vector database. It works with a set of documents in various formats, splitting them into chunks. Then, it uses a specialized model—an embedder—to create vector embeddings of each chunk, which are stored in a vector database.
Embedder is a function (neural network) that converts a text chunk into a more convenient representation. For example, "cup of milk" can be a vector of numbers like [0.23, 1.58, …, 8.45]. Similar phrases will be represented as similar vectors. These vectors and the locations of respective text chunks are then stored in a vector database.
When a user asks a question, standard RAG creates an embedding of it, searches the database for several closest embedding vectors, and returns corresponding chunks of text. For example, a user can supply the prompt "drink", and RAG will return "cup of milk" and other drinks referenced in our documents. This is the "Retrieval" part of the RAG pipeline.
After that, the user's original query is extended to include these chunks of text as additional information before passing it to the LLM, like a hint to help LLM give us the correct answer without hallucinating. This is the "Augmentation" part of the RAG pipeline.
What is Agentic RAG?
Agentic RAG, on the other hand, allows the model to use special tools to query the vector database with embeddings. This way, the model can decide if it needs access to the relevant information to answer the question, which queries to use, and how many times to access them. The model can also query additional information if the first query is insufficient.
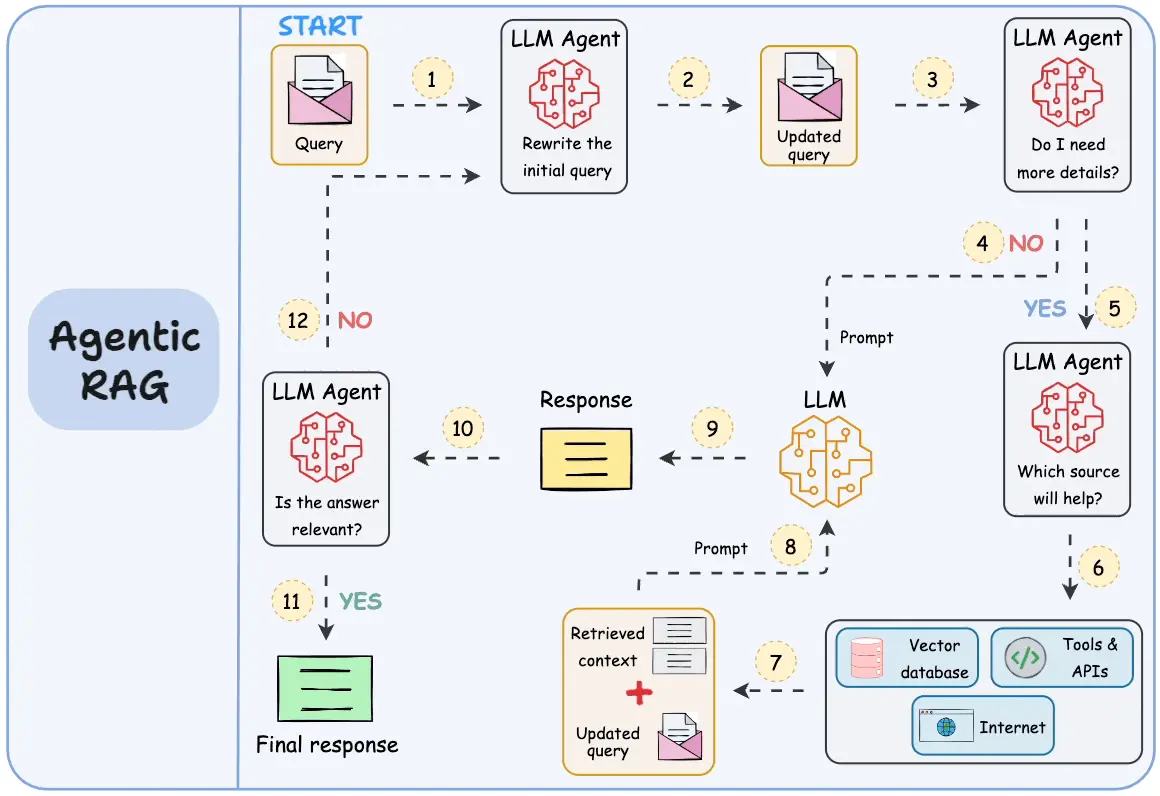
An agentic RAG system is more powerful but less predictable, more complex to debug, and more challenging to set up. Classic RAG is preferred for simple applications like ours.
Development Environment
I'm testing this locally on a PC with 4070Ti. You can skip to the next section if your machine is fast enough. Otherwise, you may want to rent a GPU machine for development. To do so, check out how to rent a GPU on neuralrack.ai below. I have been using this service to test the code in this article.
How to Rent a GPU-enabled Machine for AI Development
Dependencies
First, we need to create a Python virtual environment if you haven't done this already in a previous step.
python3 -m venv venv
source venv/bin/activate
Install requirements using the command below. You can also use the requirement.txt file from the example source code.
pip install lancedb pylance tantivy agno ollama streamlit pypdf sqlalchemy
Then install Ollama. Ollama is an easy-to-use tool for running LLM models locally.
curl -fsSL https://ollama.com/install.sh | sh
Choosing an LLM
Different models work better for different applications. You can find a comparison on the LLM Leaderboards website, ProLLM. Another important factor is the size of the model and its cost to run.
For example, if you have limited computational resources, use the 1b or 4b version of the gemma3 model. For RTX 4090 with 24GB of memory, you can use the 27b version. If you have a machine with two or more RTX 4090, you can run llama3.3 or deepseek-r1:70b. To run Llama4, you will need at least one H100.
An embedding model is a separate model used exclusively to create embedding vectors. They are usually much smaller, so we use one of the top-performing models available through Ollama, the mxbai-embed-large.
Download the Ollama models that you want to use. One is for the chat client, and the other is for embedding.
ollama pull gemma3:27b
ollama pull mxbai-embed-large
Simple RAG agent
To use RAG with the Agno framework, we must first create a knowledge base containing all our documents. The knowledge base contains Gloomhaven rules that we will reference. Creating the knowledge base means converting it to a vector representation using the embedding model described in the previous sections. We're using LanceDB because it is a straightforward vector database that can be used locally.
from agno.embedder.ollama import OllamaEmbedder
from agno.models.ollama import Ollama
from agno.knowledge.pdf_url import PDFUrlKnowledgeBase
from agno.vectordb.lancedb import LanceDb, SearchType

embedder = OllamaEmbedder(id="mxbai-embed-large", dimensions=1024)
vector_db = LanceDb(
    table_name="gloomhaven",
    uri="/tmp/lancedb",
    search_type=SearchType.hybrid,
    embedder=embedder
)
knowledge_base = PDFUrlKnowledgeBase(
    urls=["https://cdn.1j1ju.com/medias/8d/c5/21-gloomhaven-rulebook.pdf"],
    vector_db=vector_db
)
Load the knowledge base. You only have to do it once. The script will create a local database in your file system, so you don't need to do it each time you run it.
knowledge_base.load(upsert=True)
Let's use the traditional RAG first. When creating an Agno agent, we must supply the knowledge base and the flag add_context=True to enable RAG. Flags add_history_to_messages=True and num_history_responses=10 allow this agent to use a simple, fixed-length, built-in memory of the previous chat history in the same session.
from agno.agent import Agent

agent = Agent(
    model=Ollama(id="gemma3:27b", options={"num_ctx": 16192}),
    # Enable RAG
    knowledge=knowledge_base,
    add_context=True,
    # Add references to the original documents
    add_references=True,
    description="You are an expert in the rules of the board game gloomhaven.",
    instructions=[
        "Use additional data provided for the corresponding rules.",
        "Cite the rules book with the corresponding information at the end of the answer to a question"
    ],
    search_knowledge=False,
    add_history_to_messages=True,
    num_history_responses=10,
    markdown=True,
    # debug_mode=True,
)
When running ollama models with RAG, it is essential to specify a context size, which we are doing by adding options={"num_ctx": 16192} to the model. A bigger context will require more GPU memory, so adjust the context size based on your available hardware.
The default size, 2048, is often insufficient for RAG applications. It took me quite a bit of time to figure this out when I was debugging the application after changing the model from OpenAI to a local LLM.
We can test the agent like this.
prompt = "Summarize game rules in three sentences"
response = agent.run(prompt)
print(response.content)
We will get a similar result after running this code:

If we want to change this to agentic RAG, we need to make just a few small changes to the agent. Remember that agentic RAG is more powerful, giving the LLM flexibility to query the database multiple times. However, it will also make the application less predictable.
from agno.agent import Agent

agent = Agent(
    model=Ollama(id="gemma3:27b", options={"num_ctx": 16192}),
    # Enable RAG
    knowledge=get_knowledge_base(),
    # Add references to the original documents
    add_references=True,
    description="You are an expert in the rules of the board game gloomhaven.",
    instructions=[
        "Use additional data provided for the corresponding rules.",
        "Cite the rules book with the corresponding information at the end of the answer to a question"
    ],
    # Add a tool to search the knowledge base which enables agentic RAG.
    search_knowledge=True,
    add_history_to_messages=True,
    num_history_responses=10,
    show_tool_calls=True,
    markdown=True,
    # debug_mode=True,
)
Chatbot UI
Let's create a simple web interface with a chatbot running and replying to our questions.
We will use Streamlit, an open-source Python framework, to create an interactive web app. Gradio is a good alternative. Utilizing Gradio and HuggingFace Spaces is a good way to share your app with friends.
This Streamlit framework works by rerunning our script every time we interact with the webpage. This means it's essential to save the data that should be available between different runs.
This script should be in a separate file from our model python file; let's call it app.py
First, we will wrap a knowledge base creation in a single function and use the @st.cache_resource decorator. This will ensure that this function is only run once at the start of the script, and its result is cached and reused in different runs of the same session or even in other sessions (each session corresponds to an open tab with a web app).
import streamlit as st
from agno.agent import Agent
from agno.embedder.ollama import OllamaEmbedder
from agno.models.ollama import Ollama
from agno.knowledge.pdf_url import PDFUrlKnowledgeBase
from agno.vectordb.lancedb import LanceDb, SearchType

@st.cache_resource
def get_knowledge_base():
    embedder = OllamaEmbedder(id="mxbai-embed-large", dimensions=1024)
    vector_db = LanceDb(
        table_name="gloomhaven",
        uri="/tmp/lancedb",
        search_type=SearchType.keyword,
        embedder=embedder
    )
    knowledge_base = PDFUrlKnowledgeBase(
        urls=["https://cdn.1j1ju.com/medias/8d/c5/21-gloomhaven-rulebook.pdf"],
        vector_db=vector_db
    )
    # Load the knowledge base on the first run
    knowledge_base.load(upsert=True)
    return knowledge_base
Now, let's create a generator function that will return one token of text at a time. We will use it to simulate a typewriter effect in the chat bot response.
def stream_response(agent, prompt):
    response = agent.run(prompt, stream=True)
    for chunk in response:
        yield chunk.content
Streamlit has a st.session_state field that you can use to store data corresponding to the whole session. Let's initialize it with the message history and an agent we will use in the current session.
if 'messages' not in st.session_state:
    st.session_state.messages = []

if 'agent' not in st.session_state:
    st.session_state.agent = Agent(
        model=Ollama(id="gemma3:27b", options={"num_ctx": 16192}),
        knowledge=get_knowledge_base(),
        add_context=True,
        add_references=True,
        description="You are an expert in the rules of the board game gloomhaven.",
        instructions=[
            "Use additional data provided for the corresponding rules.",
            "Cite the rules book with the corresponding information at the end of the answer to a question"
        ],
        search_knowledge=False,
        add_history_to_messages=True,
        num_history_responses=10,
        show_tool_calls=True,
        markdown=True,
        debug_mode=True,
    )

agent = st.session_state.agent
Next, let's create a web interface for a simple chatbot. The main components here are st.chat_input, which users will use to enter their question, and st.chat_message, which displays both responses to the last question and the bot's previous chat history.
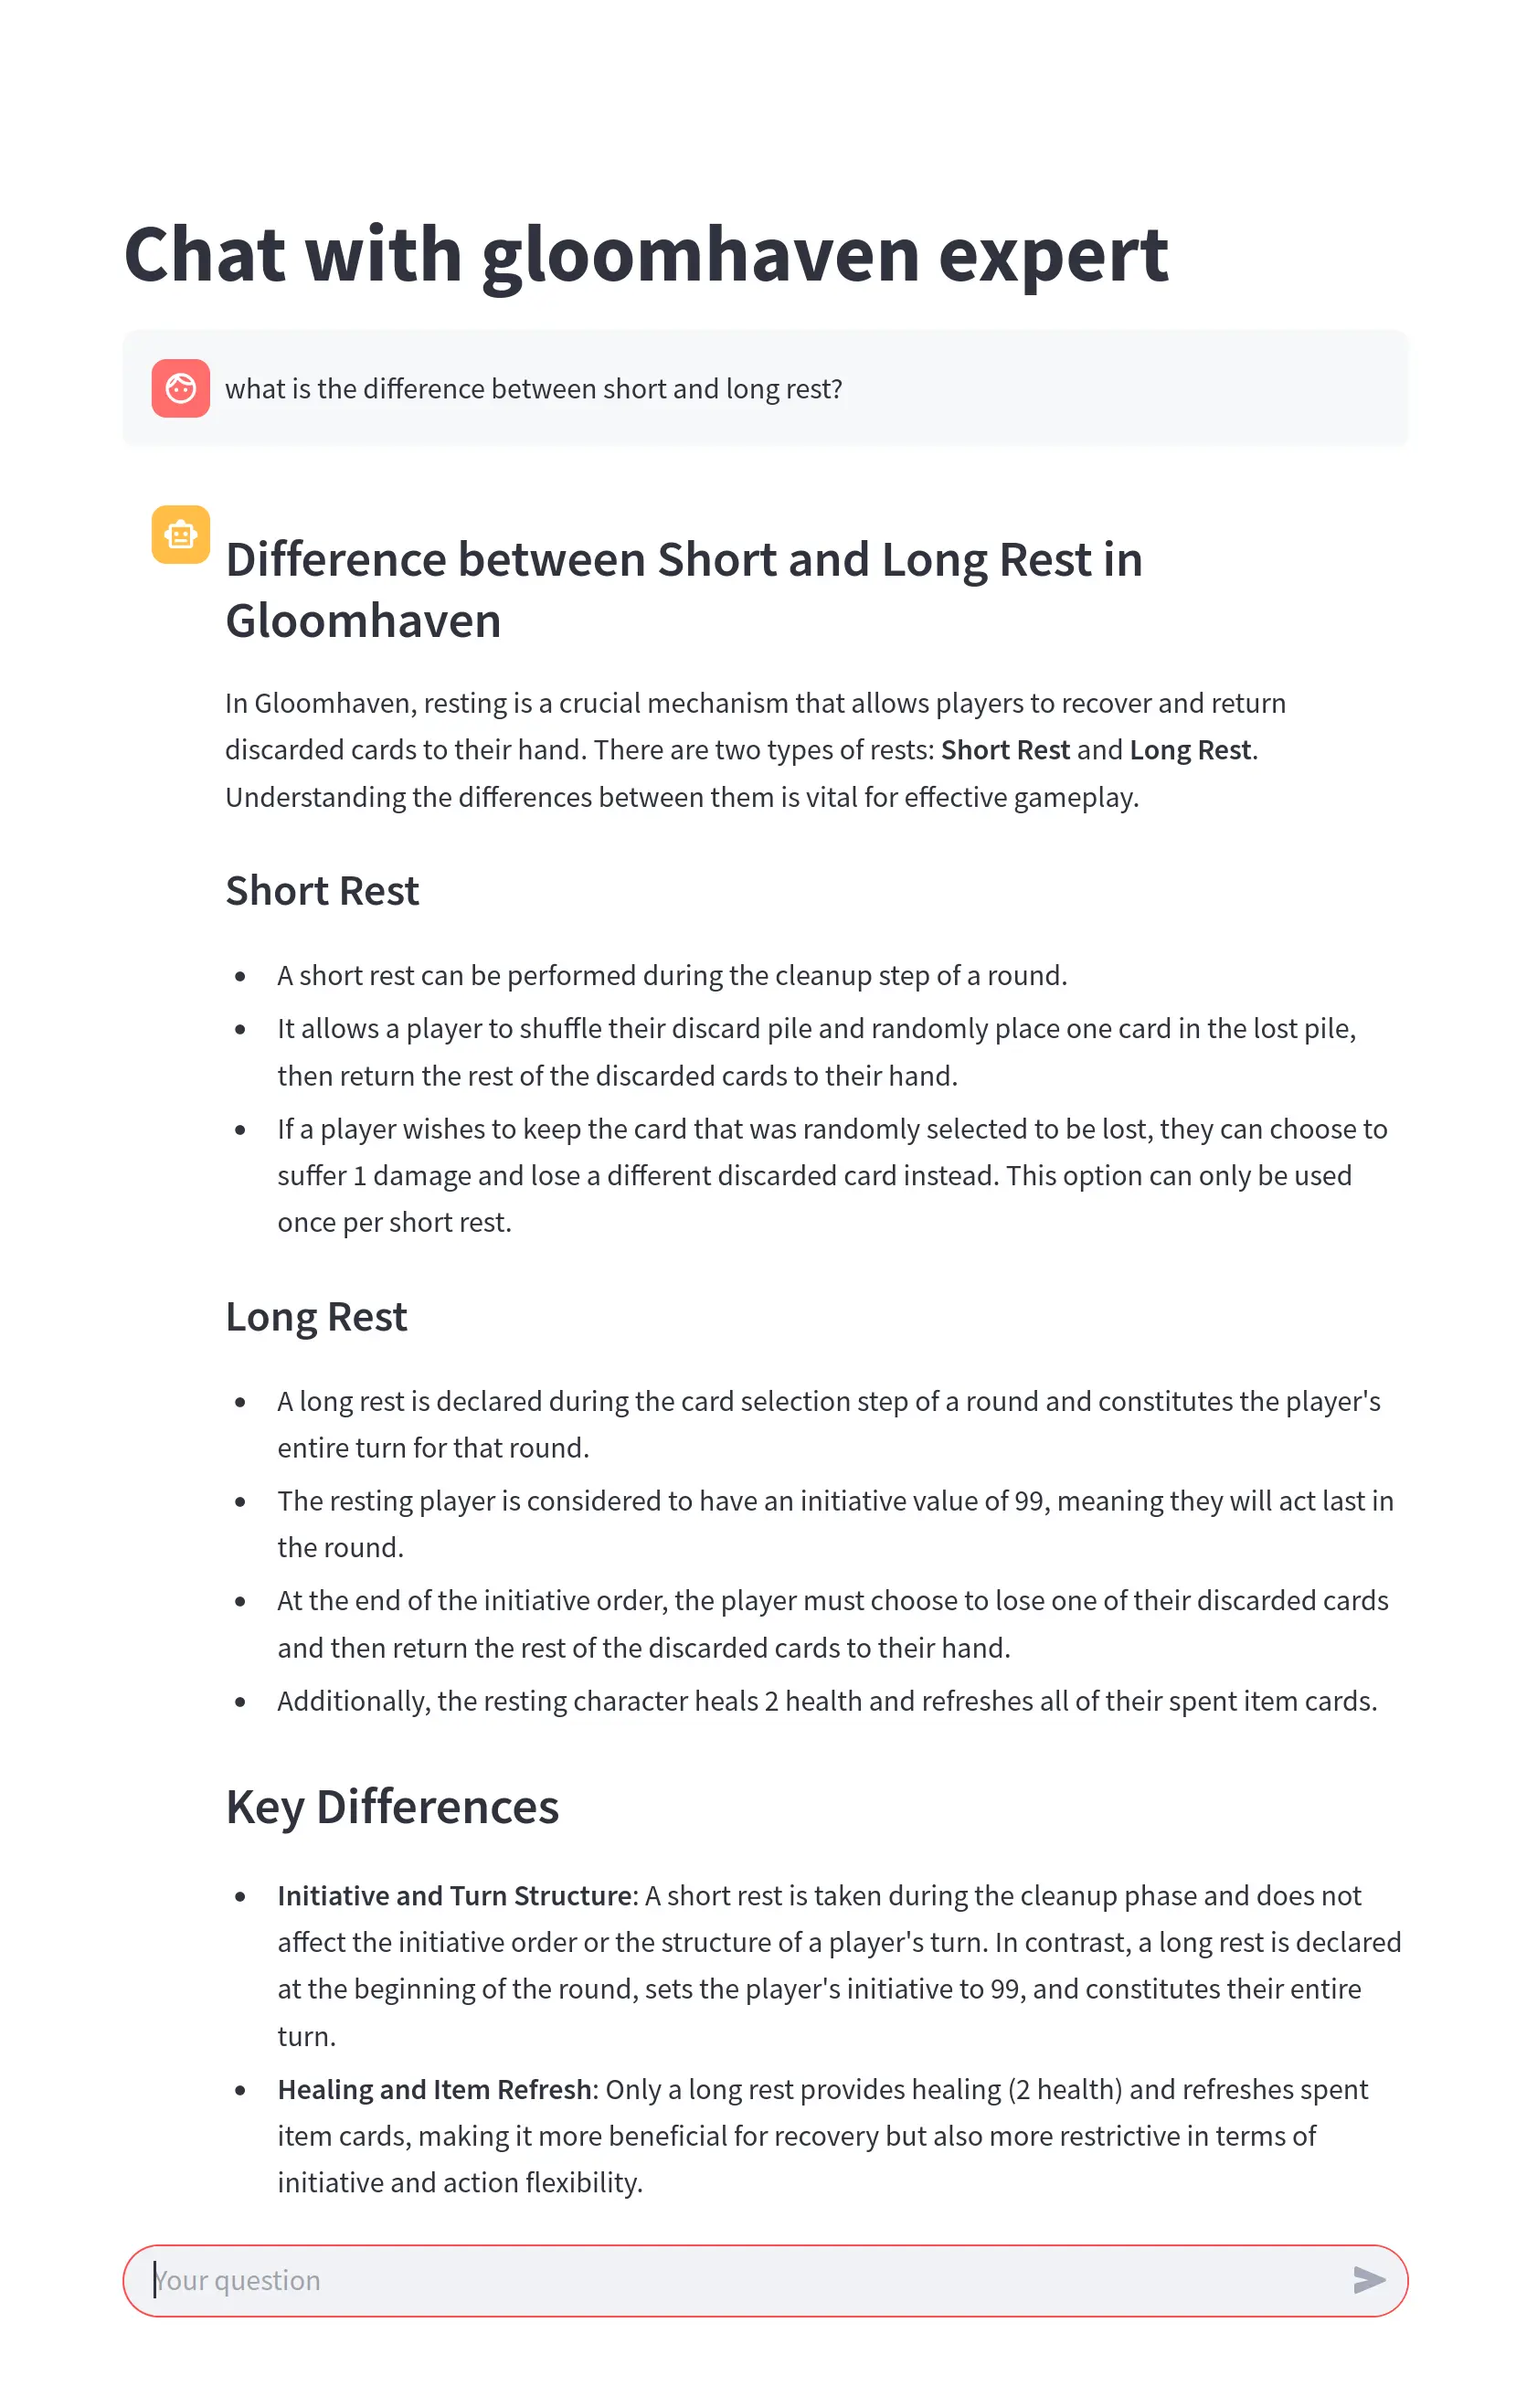
st.title("Chat with the Gloomhaven expert")
prompt = st.chat_input("Your question")
if prompt:
    st.session_state.messages.append({'role': 'user', 'text': prompt})
    for message in st.session_state.messages:
        with st.chat_message(message['role']):
            st.write(message['text'])
    with st.chat_message('assistant'):
        response = st.write_stream(stream_response(agent, prompt))
        st.session_state.messages.append({'role': 'assistant', 'text': response})
Run script with:
streamlit run app.py
Then, go to the link to see the chatbot interface: http://localhost:8501 — if running locally, http://<ip-adress>:8501 — if running on a remote server.
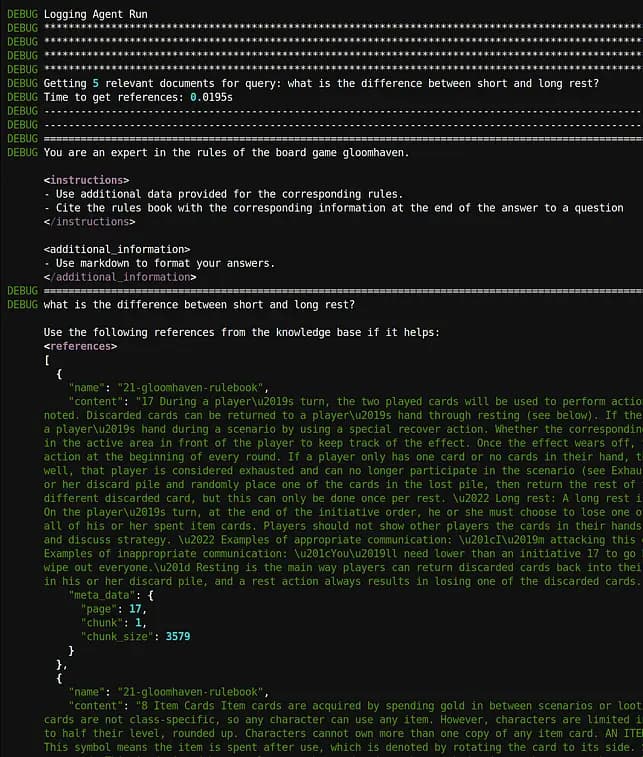
You can use the flag debug_mode=True in the agent to enable debug mode. In this case, you can look at the logs or the running RAG-enabled agent to see which text chunks were extracted from the database and check how well they correspond to the question asked.
Conclusion
This tutorial taught us how to use RAG to implement a basic AI agent that can query the knowledge base using a local LLM. Using a local LLM is trickier than relying on an off-the-shelf OpenAI endpoint, but it gives you more flexibility, allows you to save money on computing, and allows you to develop applications with tight security requirements.
I have used Agno agentic framework, mxbai-embed-large embedding, LanceDB vector database, Ollama LLM runner, Streamlit UI framework, and NeuralRack GPU rental service.
The example code is available here.
Thanks for reading!